Object of the Game
The object of BATTLE FORCES is to conquer the world through the use of strategy and negotiation.
Game Flow
BATTLE FORCES progresses through three different types of turns as follows:
Land Zone Picking (optional)
|
Capital Selection
|
Year Turn
After Capital Selection, play repeats through increasing years until the game is complete.
Land Zone Picking Turns
If the game is configured for Auto-Picking, land zones are automatically distributed to all the players and play begins immediately with the Capital Selection Turn. Otherwise, each player takes turns picking the land zones they wish to make up their empire. Water zones are not picked.
Land Zone Picking Turns happen sequentially. Picking will cycle through all players in a patter like this: 1 2 3 3 2 1 3 2 1 3 2 1... This diminishes any advantage the players who picked first may have.
Each player selects a land zone during their picking turn until all of the land zones have been picked. Water zones cannot be owned and are not picked.
Once a player picks a land zone, all of its forces become that player's. Some land zones also have naval forces in a neighboring water zone; these will also become that player's forces if they are associated with the picked land zone.
Once all land zones are picked, the game progresses to the Capital Selection Turn.
Capital Selection Turn
After all the land zones are picked, each player must then select one of their land zones to be their capital.
Capital selection is very important; care should be taken to select a capital that can be satisfactorily defended.
If a player loses their capital, they do not collect any income until it is recaptured.
In certain game configurations, the loss of your capital will result in your instant elimination from the game.
All Capital Selection Turns choices are revealed simultaneously. Once everyone has submitted their selection, the results will be displayed to all players and the game will progress to the first year turn, 'Year 2000'.
Year Turns
The actions that you perform during your turn will not be revealed to other players until everyone finishes their turn.
The results of the turn will only be calculated once all players have submitted their turns to the server.
New forces can be bought each turn, but are only available for use on the next turn.
Please see the Purchasing New forces section for more information.
After a player has completed their purchases and movement, they will submit their turn.
Once all players have submitted their turns, all purchases and movements will be
processed and any combat will be calculated. See the Combat section for more information.
This happens simultaneously.
Purchasing New Forces
There are ten different force types available for purchase and use in BATTLE FORCES. The
Force Types section describes each force type in more detail.
| Force Type | Cost in Credits |
|---|
 Troop Troop | 10 |
 Tank Tank | 15 |
 SAM Launcher SAM Launcher | 15 |
 Fighter Fighter | 30 |
 Bomber Bomber | 35 |
 Submarine Submarine | 20 |
 Transport Ship Transport Ship | 20 |
 Aircraft Carrier Aircraft Carrier | 35 |
 Destroyer Destroyer | 25 |
 Factory Factory | 45 |
Using available credits, new forces may be purchased. The new forces purchased will be built and available for placement at the end of the turn. See New Forces Placement.
Forces Movement
Movement types for different forces:
| Force Type | Movement Points | Blocked By | Blocks | Must Land Safely |
|---|
| Troop | 1 | Any | Surface | No |
| Tank | 2 | Any | Surface | No |
| SAM Launcher | 1 | Any | Surface and Air | No |
| Fighter | 4 | Air | Surface and Air | Yes |
| Bomber | 6 | Air | Surface and Air | Yes |
| Submarine | 2 | None | Surface | No |
| Transport Ship | 2 | Any | Surface | No |
| Aircraft Carrier | 2 | Any | Surface | No |
| Destroyer | 2 | Any | Surface | No |
| Factory | 0 | None | None | No |
If a force is in or enters a land or water zone with a force of another player that can block it, it will be unable to move further regardless of any additional movement points that turn.
It is useful to note that aircraft block surface forces, but surface forces (except the SAM Launcher) do not block aircraft. This gives aircraft the ability to disrupt surface movement patterns while still being able to continue moving to their final given destination.
Submarines are never blocked but they block other ships and can disrupt shipping movement by blocking them.
Transport ships can carry up to two units of cargo. Troops, Tanks and SAM Launchers each require one unit of cargo space.
Forces are only allowed to load onto a Transport Ship if they have not yet moved in the current turn, regardless of whether they
become blocked. However, if the force is blocked from combat in the previous turn, they will be unable to load.
If a Transport Ship has been blocked, it will be prevented from unloading.
Transport ships cannot move or load after unloading.
Any transport ships destroyed while carrying cargo, will result in the cargo also being destroyed.
Any forces that are carried as cargo cannot assist in combat until they are unloaded onto land.
Combat
If at then end of any turn movement, there are forces of more than one player in any land or water zone, combat ensues.
A random dice roll is generated for each force. For each successful roll, a casualty is scored upon an opponent.
Only one round of combat will happen during each turn. If all of the opposing forces in a land or water zone are
not destroyed, combat continues again during the next turn, allowing the opportunity for reinforcements to be
brought in.
| Force Type | Attack Odds | Defense Odds |
|---|
| Troop | 15 % | 30 % |
| Tank | 50 % | 30 % |
| SAM Launcher | 0 % | 20 % * |
| Fighter | 50 % | 65 % |
| Bomber | 65 % | 15 % |
| Submarine | 30 % | ** |
| Transport Ship | 10 % | ** |
| Aircraft Carrier | 35 % | ** |
| Destroyer | 50 % | ** |
| Factory | 0 % *** | 0 % *** |
* SAM Launchers can only defend, and get a 20% chance to hit each attacking enemy aircraft. They are unable to attack or defend against non-aircraft.
** Since water zones cannot be owned, all naval combat is as if both sides are attacking. This also applies to aircraft when in a water zone.
*** Factories can neither attack nor defend and cannot be destroyed.
Sometimes, there can be forces from three or more players in the same land zone. When this happens, the owner of the land zone is the defender, and all other players are the attackers. If there are no forces of the owner present in the land zone, the player with the most number of forces in the land zone is made the defender.
If there are three or more players in the same water zone, the player with the most number of forces goes against all the other players. As always for water zones, everyone uses attack odds.
Aircraft Landing
Only Fighters and Bombers may move after combat and they must have remaining range left to do so.
No blocking, takes place during the aircraft landing phase.
All aircraft must land by the end of the turn. Aircraft are only considered safely landed if they
are on a land zone that was owned by their owner in the beginning of the current turn and also at
the end of the current turn.
Fighters also have the option of staying in a water zone if there is an Aircraft Carrier in that zone.
Up to four Fighters may stay in a water zone at the end of a turn per Aircraft Carrier.
Bombers cannot use Aircraft Carriers.
Care must be taken to ensure that the proposed landing destination is not in the process of being
taken over by enemy forces. Any aircraft that do not safely land at the end of the turn will be destroyed.
Land Zone Takeovers
Land Zone Takeovers are calculated after all the turns have been processed.
A land zone may only be taken over if all forces of the owner have been destroyed and that there is at
least one land based attacking Force such as a Troop, Tank or SAM Launcher.
Aircraft cannot claim new territory as they are unable to land in territories that have not been previously owned.
If there are no defending forces but two or more attacking player forces,
then the land zone is set to neutral and will remain such until only single player remain on it.
Factories do not assist in defense and are not counted as a defending force.
If a land zone is captured with a Factory on it, the victor will control the Factory the following turn.
Place New Forces
Newly purchased forces are placed at the end of the turn. New forces can only be placed at locations where
the player has a Factory that they own. For naval forces, they maybe placed at an adjacent water zone to a
Factory so long as there are no enemy forces in the water zone or there is at least one force of the same
owner as the new placement. Forces cannot be placed at Factories that have just been captured or built.
A maximum number (not value) of forces equal to the resource value of the land zone containing the factory can
be produced at it. For example, a factory on a land zone with an income of 3 can only have a maximum of 3 units
placed at it per turn. The total value of these units does not matter, so 3 bomber or 2 tanks and 1 troop can be
placed at the factory. A factory located on ones own capital has unlimited production and does not have this
restriction.
Care must be taken that the land zone or water zone selected to produce the new force is not in the process
of falling into enemy hands. If a hostile location is selected, the force will not be produced.
New Factories can only be placed on land zones that you already owned at the beginning of the turn.
Only one factory is permitted per land zone. Factories cannot be placed on water zones.
Placed forces cannot move until the next turn.
Income Collection
Income is collected at the end of each turn.
For each land zone a player owns, they will receive credits equal to the income value of that land zone.
However, if a player does not own their capital, they will not earn income from any of their land zones
until they recapture it.
Victory Conditions
The standard victory condition for all games is conquering the world by destroying all other players. Some games have additional early victory conditions that can change and sometimes speed up the game dynamics. Four possible early victory conditions (in order of priority if more than one configured) are:
- number of capitals controlled
- total income
- number of land zones to control
- total cash
A game may have one or more of the victory conditions selected. For example, a given game may have an early victory condition of 'must control 3 capitals' or 'have a total income of 200' to win. The first player to meet one of these conditions would be declared the winner.
To view the victory conditions for the current game, just click on the Victory button located at the top of the screen. Clicking on this button will display all early conditions for victory in the current game, if any.


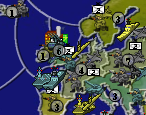 Mouse Wheel: Zoom the map. The focus point of the zoom will be
located at the mouse cursor's position. You will find zooming
extremely useful for navigating and making sense of a busy
theatre-of-war. If you don't have a mouse-wheel; don't fret, there
are other ways to zoom the map. If you have no mouse or trackpad,
you may take this opportunity to fret. Here's an example of an
unzoomed scene vs. a zoomed one.
Mouse Wheel: Zoom the map. The focus point of the zoom will be
located at the mouse cursor's position. You will find zooming
extremely useful for navigating and making sense of a busy
theatre-of-war. If you don't have a mouse-wheel; don't fret, there
are other ways to zoom the map. If you have no mouse or trackpad,
you may take this opportunity to fret. Here's an example of an
unzoomed scene vs. a zoomed one.


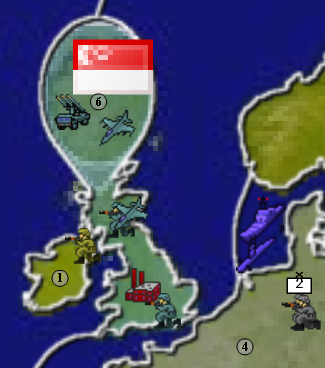
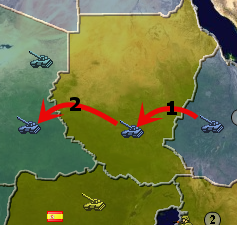 Moving your forces around the map is done with a simple drag-and-drop
interface. Grab the force you want to move, drag it where you want
it to go and then release the mouse to complete the movement. You
can only drag a force from one zone to an immediately neighbouring
zone. To move to a zone that is two borders away, move to the
zone that is closer first, then move to the final destination.
This will be executed as two separate movement steps, as can be seen in
the image to the right. This is assuming your tank has a range of
2 remaining ( it hasn't been moved yet this turn ).
Moving your forces around the map is done with a simple drag-and-drop
interface. Grab the force you want to move, drag it where you want
it to go and then release the mouse to complete the movement. You
can only drag a force from one zone to an immediately neighbouring
zone. To move to a zone that is two borders away, move to the
zone that is closer first, then move to the final destination.
This will be executed as two separate movement steps, as can be seen in
the image to the right. This is assuming your tank has a range of
2 remaining ( it hasn't been moved yet this turn ).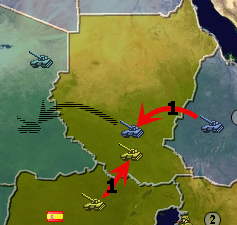

 To
aid in organizing and moving large numbers of forces, you may stack your
forces into Regiments. Just drag-and-drop onto a unit of the same
type to expand or create a Regiment. You may drag-and-drop forces
out of a Regiment as well. To move the entire Regiment at once,
drag-and-drop using the Regimental symbol floating above your
forces. Regiments are only composed of forces of a similar
type. To move a mixed-force army, you can shift-click to select
multiple forces. Hold down the shift key and then click on a force
you own. Do this to any number of forces you want to move.
Then drag-and-drop one of the selected forces; the others will
follow. Use the ctrl key to toggle units as selected or
unselected. Clicking anywhere on the map outside of a selected
unit will deselect all units. This is similar behavior to standard
operating system procedures, which you are most likely already familiar
with.
To
aid in organizing and moving large numbers of forces, you may stack your
forces into Regiments. Just drag-and-drop onto a unit of the same
type to expand or create a Regiment. You may drag-and-drop forces
out of a Regiment as well. To move the entire Regiment at once,
drag-and-drop using the Regimental symbol floating above your
forces. Regiments are only composed of forces of a similar
type. To move a mixed-force army, you can shift-click to select
multiple forces. Hold down the shift key and then click on a force
you own. Do this to any number of forces you want to move.
Then drag-and-drop one of the selected forces; the others will
follow. Use the ctrl key to toggle units as selected or
unselected. Clicking anywhere on the map outside of a selected
unit will deselect all units. This is similar behavior to standard
operating system procedures, which you are most likely already familiar
with. All aircraft must end their turns positioned either in a friendly land zone or,
for fighters; in a water zone with a friendly aircraft carrier.
After moving your aircraft to a combat position, you can specify where
it should land by dragging the landing strip icon directly to the
desired landing zone. Mousing over either your aircraft or the
landing strip will let you know if you have enough range to make it
safely. After submitting your turn, the battle calculator will
attempt to auto-land any aircraft that don't have valid landing orders
assigned by you.
All aircraft must end their turns positioned either in a friendly land zone or,
for fighters; in a water zone with a friendly aircraft carrier.
After moving your aircraft to a combat position, you can specify where
it should land by dragging the landing strip icon directly to the
desired landing zone. Mousing over either your aircraft or the
landing strip will let you know if you have enough range to make it
safely. After submitting your turn, the battle calculator will
attempt to auto-land any aircraft that don't have valid landing orders
assigned by you. You
may only build new forces on a land zone you own that has a factory on
it. With the exception of factories, which can be built on any
land zone you own. You will always start the game with at least one
factory (located at your capital land zone). Naval units can be
built in a water zone if it borders a land zone with a factory.
You
may only build new forces on a land zone you own that has a factory on
it. With the exception of factories, which can be built on any
land zone you own. You will always start the game with at least one
factory (located at your capital land zone). Naval units can be
built in a water zone if it borders a land zone with a factory.